Live Heart Rate Data

I have just purchased a set of 10 Polar H7 heart rate sensors to use with my PE students. These heart rate sensors bluetooth to the Polar Team app on my iPad which I project onto a big screen via an Apple TV. Everyone can then see what is happening to each students heart rate as they participate in the lesson. The display shows the name of the student, their heart rate and also the percentage of the students maximum heart rate they are working at (maximum heart rate is found by subtracting your age from 220).

Check out the video below showing the heart rate sensors in action. I have also included some screen shots of data captured by the Polar Team app. This data provides a great source of information for students to analyse.

Individual detailed results including the percentage of time spent in each training zone.

IMG_4070 IMG_4071

I am looking forward to using the app to help my year 11 and 12 students develop their knowledge of acute responses to exercise and how the energy systems interplay with each other during a sporting activity. If anyone else at PBAS is keen to use them just ask. A great way to get students interested in their hearts and whats happening when they exercise while generating “real” data for a maths lesson.

Publishing to a world wide audience

external_image

I have wanted to do this with students for a while and finally had the opportunity to do it with my Year 9 ICT class. The Year 9’s have published a book about Port Broughton to Apple’s iBook store. Click HERE to view and download the book.

The book can only be read in the iBooks app on an iPad or Mac computer.

Requirements: To view this book, you must have an iPad with iBooks 3 or later and iOS 5.1 or later, or a Mac with iBooks 1.0 or later and OS X 10.9 or later.

The Year 9 ICT course is all about how students can use their MacBooks more effectively and to show students the possibilities that their MacBooks provide. The book is the end result of students learning how to use the app, iBooks Author.

Prior to the class book being created students developed their understanding of how iBooks Author worked, creating their own books on a country they would like to visit. This allowed me to explicitly teach students how to use iBooks Author.

Once the topic of our class book was decided students were allocated chapters/sections to complete and sent away to collect images and create text for the book. Students completed their work on Word documents and collected images in JPG format. These documents were then Airdropped from their MacBooks to mine. Airdrop is an outstanding feature on the MacBook, iPad and iPhone. It allowed me to easily get multiple photos and Word documents from my 14 students quickly with no USB or cable connection required. The book was put together on my MacBook in iBooks Author with students able show me how they wanted their work formatted.

Once the book was completed the process to publish it from my MacBook to iBooks was reasonably simple. Selecting the Publish function in iBooks Author allows you to enable iTunes Connect and decide if you want to offer your book for free or sell your book. The third step in the process is to download iTunes Producer (through iTunes Connect) and use this to to upload the book to Apple for approval, which took approximately 4 days. My account, which was used to publish the book, is set up book to provide free books only. My understanding is that setting up an account for selling books is a little more complicated.

There are a number of clear benefits to students doing this activity which include:

  1. Publishing to a world wide audience requires a certain level of quality.
    • Understanding that family, friends, teachers and the wider public will be able to access their book meant that students spent considerably more time drafting and editing. Three fifty minute lessons were used for drafting the book. Approximately 50% of students were involved in the first two lessons. In the third lesson 100% of the students were involved in editing the book which was projected onto the whiteboard in its final iBook format.
  2. Learning about and understanding copyright.
    • We didn’t go into great detail but students very clearly understood that permission had to be granted to use most images and that acknowledgement of sources was important. Students also learnt were to find copyright free images like the State Library of South Australia (online collections). Students contacted the Northern Argus, the Port Broughton Bowling Club and Barunga West Council to get permission to use their images while I approached the local caravan park and South Australia Media Gallery. The S.A. Media Gallery required an account to be set up and a written application applying for use of their images.
  3. Students who are interested in writing as a pass time or future career have been exposed to a legitimate and professional way of publishing a book.
  4. I haven’t asked the students yet but I am assuming there is also a certain feeling of accomplishment having contributed to a book that has been formally published. My intention is to ask the students how they felt about the process and if it was a worthwhile experience.

The following images are of pages from the book in the iBooks Author app prior to being published.

Screen Shot 2015-03-05 at 7.22.04 pm Screen Shot 2015-03-05 at 7.22.27 pm Screen Shot 2015-03-05 at 7.15.54 pm

Promethean IWB Activote and Socrative – Student Response Systems

Promethean IWB ActiVote

Collecting feedback from students regularly (daily) and in a way that allows a teacher to see areas of weakness across a class or with individual students is important if we are to move student learning forward. At PBAS Paul has set up and is using the ActiVote devices with his Year 5/6 class to get feedback from the students about how well they have understood concepts he is teaching.

ActiVote Devices – The quote below has been taken from the Promethean website.

“With ActiVote, you won’t have to guess whether students truly grasp the lesson content. The entire class clicks to respond and answers are instantly viewed, shared and discussed on the ActivBoard in simple  formats, such as bar graphs and pie charts. Gain insight into student progress and use real-time feedback to determine whether you need to review, re-teach or proceed with the remainder of lesson. Students build confidence with every vote, while evaluating their own progress through both instant feedback and achievement records tallied over time.”

As with most technology understanding how it can be applied and setting it up so that it consistently works can prove challenging. Paul has had to persist and overcome a number of hurdles to get his ActiVote devices working but now that they are he is very pleased with the results. Having overcome the initial problems Paul has a set of ActiVote devices for his classroom set up so that each student knows their device and can quickly access it. Paul can display questions, the students can respond and the data can be displayed immediately in a number of formats (selected by Paul). The data can also easily be saved to an Excel document for further analysis.

One example Paul provided me with was his use of the ActiVote devices in a maths class. Students had covered a concept and Paul wanted to see what gaps in student knowledge remained. He designed a series of questions for the concept and had students provide their answers using the ActiVote devices. He found that for the majority of questions about 95% of the class understood. There were a number of questions however where 75% of the class struggled, providing Paul with an easy and quick way of seeing what needed to be revised. This use of the ActiVote devices is much more time efficient for Paul when compared with collecting up each students homework contract and marking all students attempts at similar maths problems to find out the same information. Obviously question design is critical when using these devices and multiple choice questions have their limitations so understanding and continuing to use other methods of formative assessment is also important.

The benefit to PBAS of Paul’s hard work getting his ActiVote devices up and running is that we now have a great resource to draw on if others wish to use the same technology. I know that Paul is currently working closely with Jackie and her 3/4 class to set up the devices in that room.

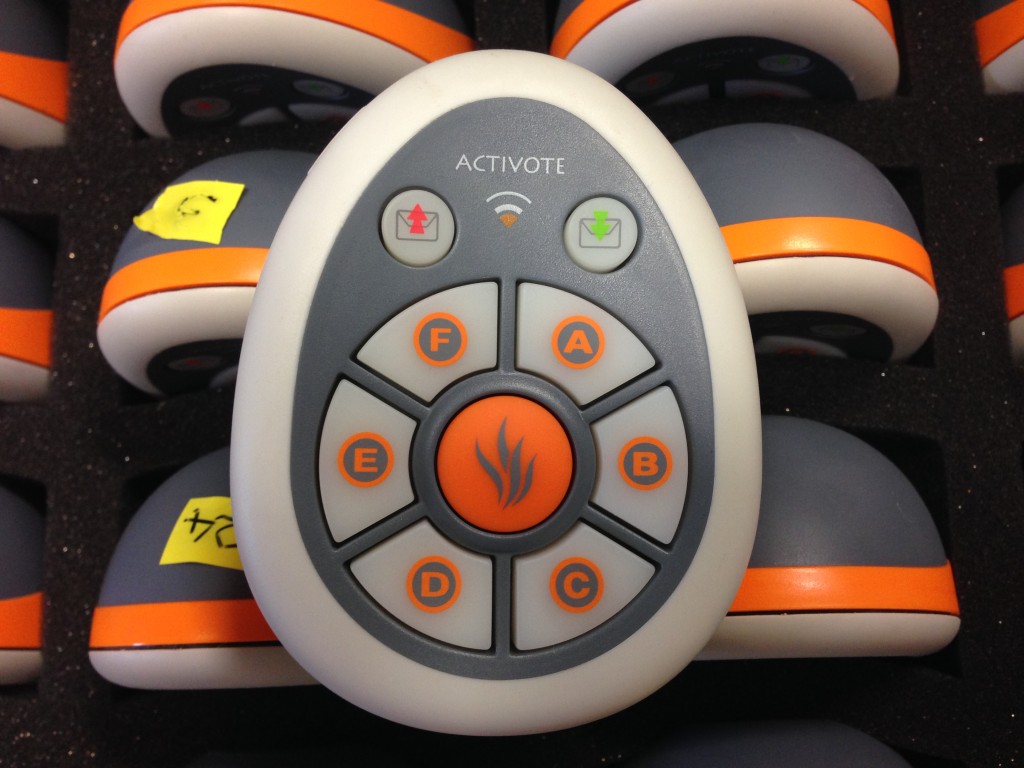
Below is an image of the Activote devices. Below the image is a video which is quite old now but will give you an idea of the ActiVote devices and how they work.

IMG_1889


Socrative

Socrative is an online student response system that is exceptionally easy to use if you have a access to the internet and students have access to a device (laptop, PC, iPad). At PBAS I see this as a great tool to use with the 9/10 class as they all have access to their MacBook. With the immediate access our Year 9/10 students have to MacBooks Socrative becomes a very effective formative feedback tool for teachers to use.

To set up Socrative the teacher needs to create an account (students do not need accounts) and once logged in can create quizzes and exit tickets (multiple choice, True/False and short answer options are available).

When the teacher is ready to give a quiz they get students to log in by going to www.socrative.com, click on Student Log In and enter the teachers Room number (mine is 83286 which you can see in the image below). Once students are in they will see the quiz and can begin. As well as quizzes teachers can generate Quick Questions (instant feedback on something just discussed) or Exit Tickets (answer prior to leaving the room).

Teachers can also choose what type of quiz they want students to undertake. Options include Student Paced with immediate feedback – students will see the correct answer or teacher explanation straight after answering the question, Teacher Paced – teacher controls the flow of questions.

Socrative allows the teacher to turn a quiz into a game called Space Race. The teacher can choose the number of teams, auto assign or have students pick colors, then student paced answering of questions determines how “fast” each spaceship proceeds.

See the video at the bottom of the post for further explanation of how Socrative works. The video gives a example of the teacher and student devices working side by side showing what is happening on each.

Screen Shot 2014-07-30 at 9.58.39 am Screen Shot 2014-07-30 at 9.59.19 am Screen Shot 2014-07-30 at 10.00.14 am

Screen Shot 2014-07-30 at 10.23.54 am

Minecraft Edu

I have always been fascinated by Minecraft. It is simple and easy to use, kids love it and it is an open ended creative virtual environment that has a wide range of applications for learning. I must admit that I do not have a Minecraft account but two of my children share an account and they are hooked. They spend time creating dwellings mostly, designing living environments and watching videos of what others are doing in Minecraft.

What motivated me to write this post was an article (passed to me by Wardy) in the Kadina Memorial School newsletter. Teacher Luke Atkinson wrote about how his 5/6 LA class had used Minecraft to learn about Sustainability. I have copied and pasted the article directly from the KMS newsletter below.

As part of our ‘Sustainability’ focus within Design and Technology the 5/6LA (TR2) class used Minecraft. This wasn’t just any random level, but a specifically designed map with 2 islands. Each island had limited resources. The aim for students was to create a sustainable environment. I had my own underlying focus on sociology and wanting to watch how the students interacted with each other. The students formed 2 groups, each of which had an island to themselves. My role was to watch and not influence what the students chose to do. This type of learning is dependent on reflection and what outcomes the students see as important.

By the end of the lesson many students had much to say about what they had achieved. Island 1 was decimated, with barely anything left. There was no food (apart from a pig stuck in a tree) and limited trees were remaining. The group was so focused on building a huge and amazing house for everyone… they ran out of resources. Island 1 commented that if they had to do it again they would build a smaller house and focus on re-growing trees, rather than cutting them down without future planning.

Island 2 built many small houses on their island, some into the hillside, others made of wood. The students commented that if they were to do it again they would maximise the land for food (animals and crops) and not build houses out of wood but stone, as wood is flammable.

Oddly enough there was also an Island 3. Two students didn’t agree with what Island 1 was doing so they dug out some sand and dirt and started to build their own island. They discussed the importance of working with others and planning when using limited resources. The students had countless stories to tell and wrote up what happened. There were discussions on how to improve for the future and how this reflected upon their own lives. They had created a system of law enforcement (a prison I was to run for them), discussed resource management, the correct use of resources and even built a separate nation for those who didn’t agree. Only in minecraft could this open and deep version of learning be possible.

Luke Atkinson, Kadina Memorial School

This is a great example of how Minecraft can be used in the classroom and thought it was worth sharing with everyone.

Not having much experience (none) with Minecraft in schools my understanding is that schools can use the original version created by Mojang or MinecraftEdu a version designed by Teacher Gaming with full endorsement from Mojang. The total cost to purchase MinecraftEdu across 28 computers would be a one off cost of $433.

Below are some videos helping to explain Minecraft as an educational tool.

Click here to visit the Educrew YouTube Channel.They have 12 instructional videos to help you get started with MinecraftEdu.

PBAS Student Free Day Term 2 2014 – Compass Tool and AC

As there where a number of staff not at PBAS for the student free day for a range of reasons I thought I would share the Power Point presentation that we went through in the morning session.

Our discussion centred around the TFEL Compass tool to provide student feedback to teachers and using the Achievement Standards and Content Descriptors to plan units and assessment tasks for term 3. After our morning discussion the day was spent focusing on these things. Teachers then met at the end of the day to share what they had been able to achieve during the day.

As part of the presentation we also revisited the DECD policy regarding A-E grading. I will be printing a copy of this to put in trays in the coming days. A copy is also in the presentation below.

It would also be great for the JP teachers to share any useful resources that they found during their time at Moonta/Kadina looking at moderation and Learning Design. Ange has already approached me with what looked like a great resource for keeping track of the Australian Curriculum developed by Adele Kehler.

Art on the iPad

Our school iPads have two dedicated Art apps, Brushes and Art Set. Both can produce quality art work using a stylus once students are used to how the apps work. This post is not about how the apps work, if you are interested in using them I suggest the best way is for students and teacher to have a play with the app and share that knowledge within your class.

One of the great features of the Brushes app is that it allows the artist to play back how their art work was created. You can press the play button and watch from beginning to end how the art work was constructed. Not only will the students enjoy watching their art work be recreated before their eyes but the opportunity to view how others constructed theirs is a great learning opportunity. Below I have included a video of something I did in Brushes last year when I first played around with the app. Sorry it is a bit shaky I had to play it on the iPad and video it with my iPhone.

I would like to acknowledge @kevinhoneycutt for tweeting the following image which encouraged me to remind you about these two apps and their potential use in the classroom.

Screen Shot 2014-02-23 at 2.27.38 pm

Ever Wonder? – Wonderopolis

Ed thought this website might be interesting for staff and students (he can’t help himself). I have had a quick look and it has some great things on it. If you hadn’t made the connection the site is all about wonder and encouraging kids to learn new things. There is one particular page which caught my eye called Explore Wonders and if you click on the image below you will be taken to this page. It has a huge array of videos on a wide variety of topics, some of which you can see in the picture. Each video is combined with text to encourage thinking about the concept. Some videos are instructional while others have no direct instructional value but when combined with the text cause you to think and wonder.

Screen Shot 2014-01-30 at 4.48.27 pm

Compress Video – Save space on your iPad

mzm.nfajnqiw.175x175-75

Here is a great free app called Compress. If you keep video on your iPad or iPhone and want to free up some space without deleting your videos then get this app. There are three levels of compression. The two levels offering the higher quality will compress videos at the following levels (these numbers are taken from a 3 min video compressed on my iPad). 262MB to 115mMB using the 720p quality compression and 262MB to 20MB using the 360p quality compression. The quality drop is minimal and I found it difficult to hear or see any difference between the original and compressed version (both 720p and 360p).

Before using the Compress app I had 8GB of free space on my 32GB iPad. I keep a large amount of video on my iPad including skills video and Just Dance video for PE as well as keeping video in student portfolios as part of student assessment in HPE. This means I am always on the edge of filling up my iPad, particularly towards the end of a semester. So after compressing 17 Just Dance videos (took about 15 minutes) on my iPad I suddenly had an extra 2.2GB of free space. This was using the 720p compression option, had I used the 320p option I would have saved myself 4.5GB plus of space.

Note: Video over a certain length (10 minutes from what I can gather) cannot be compressed by the app without the app trimming your video which is not practical.

My main use for this app will be compressing instructional YouTube video and video for student portfolios.

Thanks to @mrKampen who shared a blog post on his iteachPE blog explaining the Compress app.

Removing work from iPads

At the beginning of the year I thought it might be useful to remind staff how to get work off of the iPads and what options are available.

File Browser

This is the most effective in terms of being able to access student folders and the P Drive (Curriculum) on our school server. Students can create documents in Pages, Keynote, iMovie, Strip Design, Book Creator, Puppet Pals 2 and Brushes for example and transfer them directly to their student folder. Some of these apps like Book Creator and Strip Design, Pages and Keynote allow you to use File Browser straight from the app while others like iMovie, Puppet Pals and Brushes require you to save to the camera roll first and then use File Browser.

I have included a quick 3 minute video that helps explain how to use File Browser. This presentation was made using the Explain Everything app which is on our student iPads and is a great tool for students to present their work on.

AirDrop

AirDrop iconAirdrop_icon-3

Airdrop for iPad       Airdrop for Mac

The easiest way to transfer documents from one iPad to another. It is however limited when compared to File Browser. It is easy to activate AirDrop and then transfer video/images (from camera roll) or documents from Pages and Keynote. As time goes on more apps will likely incorporate Apples AirDrop functionality within their apps.

The great thing about Airdrop is that it does not require an Internet connection, it just requires WiFi and Bluetooth to be enabled. To read a quick explanation of how to use Airdrop click here.

Note: The year 9/10 students and their teachers can Airdrop work between MacBooks. It is not currently possible to Airdrop between iPads and Macs although would expect this to change in the future.

Connect via USB Cable

Apple have finally seen fit to allow iPads supervised by Apple Configurator (the software we use to run the iPads) to be connected and recognised by other Mac computers (unfortunately not Windows machines). There are a number of Mac machines in the school including the 4 iMacs in the primary area and 4 staff MacBooks (Justin, Allan, Nick and one not allocated yet).

Turn on the Mac computer, connect the student iPad and a USB. Transfer your video or photos by dragging and dropping from the iPad to the USB.

Note: All Lightning USB cables for the student iPads are connected to the iPad cart and cannot be removed. If you wish to use this method you will need to use the lightning USB cable that came with your teacher iPad.

Need Help?

Please ask! If you have any issues with any of the above 3 options please come and see me. I am more than happy to help with any trouble shooting. If you are in the middle of a class and want to transfer student work and I’m in my office I am always happy to come out and help – just ask. All 3 methods are fairly straight forward and will not take a great deal of time for me to help you with.

Email

Currently unavailable. Last year the students had the ability to email work from the iPads. Unfortunately over the holidays I had to reimage (unsupervise and re-supervise) all the iPads. This meant wiping all settings and content which included email settings. As email is configured manually on each iPad I have just not got to it yet.