Using Book Creator to record student learning

Learning Aim

One of the focus areas for my Year 3/4 PE class in the first half of term 1 is preparing for sports day. My aim for the students is to practice and refine the skills needed to participate confidently in our upcoming sports day. In Australian Curriculum language – “Practice and refine fundamental movement skills in a variety of movement sequences and situations”. The year 3/4 students do a 600m run, shot put, long throw (vortex), long jump and a sprint race. We will also be practising discus even though this is not a required event on the day.

Recording student learning

To record student learning I have decided to use the app Book Creator on my iPad.

IMG_0072

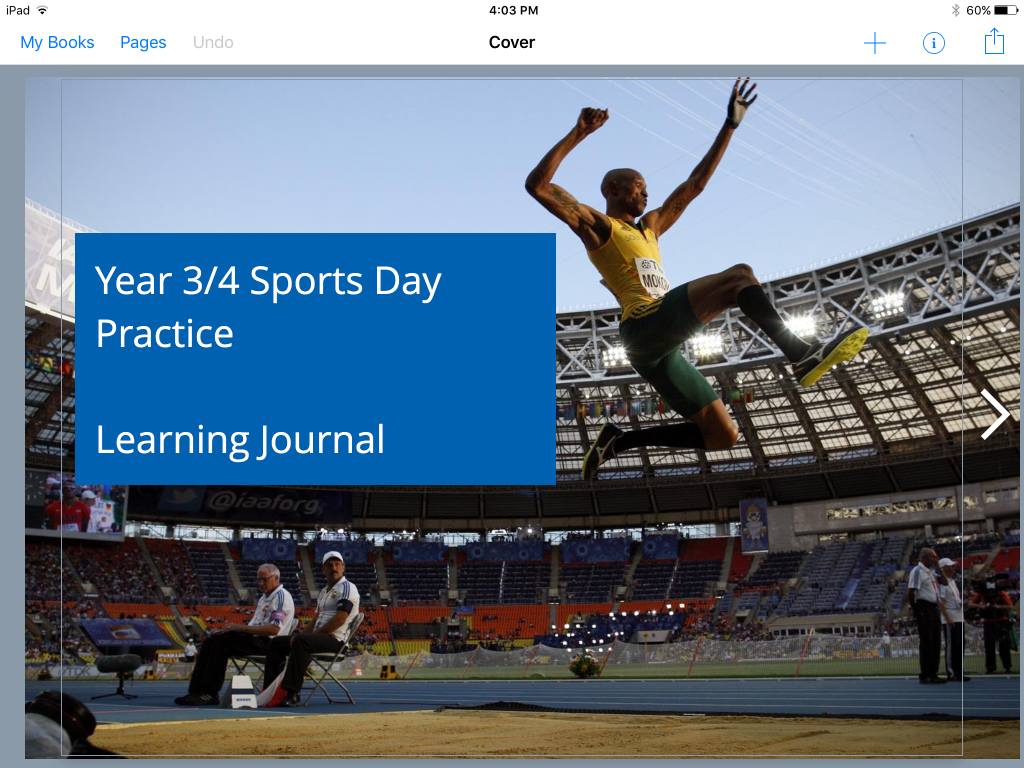
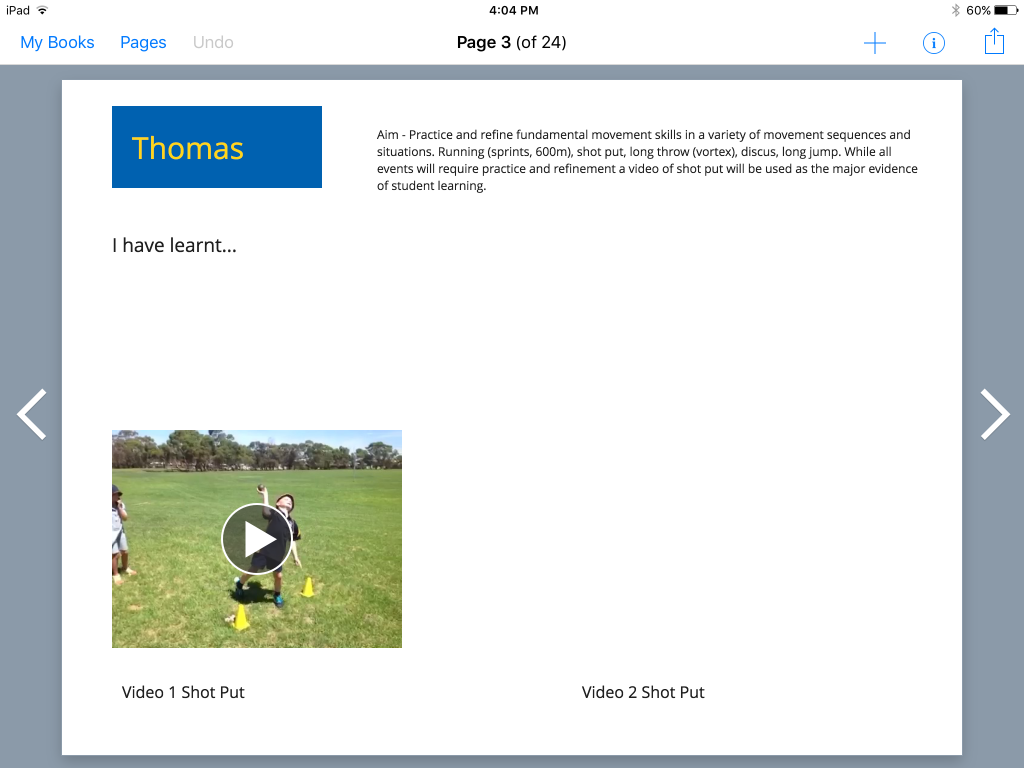
The book I created has one page per student which includes their name, a space for personal reflection and two spaces for video. To simplify the process I selected shot put as the event I would video for every student. Video one was taken last week (week 2) while the second video will be taken in week 6 or 7 allowing students to demonstrate their improvement over time. The “I have learnt …” section of the page will be completed by the student. Their task will be to reflect on all the other learning they have achieved in the events other than shot put. How have they improved? Which events did they make the most progress in? What advice did they get from the teacher that helped them improve? Did they persist?

IMG_0073

Process (I have completed up to part 2 – inserting video 1)

1. Firstly we discussed the focus and aim of our lessons leading up to sports day.

2. Collecting video in the book

  • In our week 2 lesson the class was divided into 3 groups – long throw (vortex), 300m run then long jump and shot put.
  • I worked with the shot put group recording their efforts directly into the book in Book Creator. No instruction (other than some safety tips) was given so that the first video reflected the student’s current level of knowledge. Once I had finished with a group all groups rotated to the next activity.
  • This process seemed to work smoothly and was easily completed in one lesson with 24 students. The process was made smoother by having the groups match the order of student names in the book. Group 1 were the first 8 names of the book and group 2 were the next 8 names etc. This meant I didn’t have to spend time finding student names in the book I just started at page 1 and worked my way through to the last page.
  • The Book Creator app allows video to be taken and inserted within the app so I did not have to go between the camera and Book Creator apps.
  • The second video will be added in week 6/7.

3. Using the video to learn

  • We will go through a process of examining the correct technique for shot put (images/video/me demonstrating).
  • As a class we will watch everyone’s video (5 secs each) and give feedback as a class to that person. We will have strict protocols around reacting to others performance and the type of feedback we were allowed to give. Showing videos to the whole class will be voluntary (hoping for 100% though – I will be convincing them through discussion about growth mindset and learning from others).

4. Collecting and inserting student responses to “I have learnt…”

  • In a PE lesson (week 6/7) all students will be given an iPad. Using the Pages app they will record their responses to the reflection questions. Doing this as a group will allow for some class discussion and sharing which will hopefully assist those students who are finding the reflection process difficult.
  • Students will airdrop their document to me and I will copy and paste their text into the book.

Teacher observations

  • Throughout the topic I will keep my own notes and observations on my iPad separate to the book. When assessing students I will use a combination of what is in the book as well as my own notes.

Using video as a starting point in practical lessons

Video 1 also provides me with a starting point for shot put i.e. what do the students bring? What knowledge do they already have? Taking video in the first week or two of a practical topic provides the opportunity to closely examine where students are at and therefore, starting points for future lessons. Using the iPad camera and photos apps can be powerful formative assessment tools.

Using this process with other subject areas

Use the same process to record student learning over a series of lessons, a term or semester in:

  • Reading
  • Handwriting
  • Speaking to the class
  • Explaining a math concept
  • Word pronunciation
  • Creating a hypothesis (video/text/audio) and then conducting an experiment (video) to prove or disprove the hypothesis.

There are four ways to add student evidence to a book – video, photos, text and audio. All of which can be done within the app.

Teachers are always looking for ways to record evidence of learning and Book Creator is a simple and efficient way of doing this. Once my book is completed I will share the book as a video to my MacBook and also place it into iBooks on my iPad. My goal is to end up with a document that provides me with evidence of student learning that I can reference against my own observations.

Book Creator – What’s New?

book creator

Book Creator is a quality app that is simple to use (the Year 1/2 class would have no trouble getting the hang of it). It is the most versatile literacy based app we have on the iPads – it is a great way for students to present their learning.

The latest update to Book Creator provides a significant addition to this great app, the ability to create comic books. The thing I have always liked about Book Creator is its simplicity while still producing a great product. The comic book addition continues these qualities making it easy for your students to produce their own.

Step 1: Select a format

IMG_0032Step 2: Add the number of panels you would like. There is a wide selection of panel formats.

IMG_0033

Step 3: Then select your photos or own drawings, stickers, text, speech bubbles and shapes. You can also select from a range of comic book style backgrounds. I didn’t have time to put together a traditional comic so I put in some photos from our family trip to New Zealand.

IMG_0038 IMG_0037

Once the students have finished their comics (or regular book) there are a number of ways to share the completed product:

1. Using the share button in the app students can put their book into the iBooks app on the iPad. Select the share button in the app and choose Export as ePub then Open in then iBooks. The comic can then be read similar to a traditional book by turning pages. Any audio and video will be able to be listened to and viewed in this format. This does not remove the comic book from the iPad.

2. If you want to remove the comic from the iPad there are 4 options.

  • Using the share button in the app select Export as Video then Save Video (or alternatively select Open in and select File Browser and use this to save to a student or teacher folder to our network). A video of the book will be saved to the camera roll through the Save Video option. This video can then be removed using File Browser or connect the iPad to a Mac computer and remove it directly onto that computer (any audio and video embedded in the book will be preserved).
  • Export as PDF then Open in then File Browser. Exporting as PDF will lose any audio or video embedded in the book. A great option if you want a hard copy of the final product.
  • Airdrop can be used to export the book as a video, PDF or ePub file to any other Apple device that supports Airdrop.
  • If you wish to save the book as an ePub file onto a computer so that it can be transferred to another device select the share button in the app and choose Export as ePub then Open in then File Browser. This ePub file will be saved but not viewable on a Windows PC. The file can then be put onto any other device that has iBooks.

I have included a video of the comic book I created.

Any subject can use this app to allow students to demonstrate their learning. It produces great digital evidence (no storing paper in a tray or cabinet) for teachers to use at a later date when making judgements about student learning.

If you are interested in learning more about Book Creator and have a device that has iBooks (iPad, iPhone, MacBook) you can get the “Book Creator Teacher Guide” for free (log into the iBooks store with your Apple iTunes id).

cover225x225 Book-Creator-Teacher-Guide-choose-your-subjectThe guide provides a wide range of ways to use the app and can be accessed by subject area from the contents page. Just because your subject area does not appear on the above page don’t be put off by this, any subject can use this app.

The teacher guide will help you with creating:

  • Illustrated audio books
  • Instructional writing
  • Illustrated and audio poetry
  • eBooks in different languages – the language setting can be changed to Spanish so students will be writing and reading in Spanish!!
  • Contents, reference and bibliography pages with links
  • Character motives and opinions
  • Interactive eBook to teach languages or nouns
  • A phonics resources
  • Comic books
  • Newspaper pages and video reports
  • Interactive stories
  • A random story generator
  • Numeracy vocab books
  • Problem-solving processes
  • Science investigations
  • Interactive science books
  • A book to capture the different stages of a technology project
  • Artwork portfolio
  • Interactive maps
  • Compare then and now
  • Biographical books
  • Chronological timelines
  • A record of progress when creating programs or an instruction book for programming (using apps like Hopscotch)

Here are some other links to ways in which teachers have used Book Creator in their classrooms.

  1. 2nd Graders use Book Creator to share their family history with grandparents
  2. Maths – combining the Geoboard app with Book Creator
  3. Publish a photography book while this post is not about students publishing their work the idea of keeping a digital portfolio in a practical subject like photography is a good one.
  4. Writing up a science experiment with Book Creator


Book Creator – A great app for presenting student learning

If someone asked me to list my top five apps to use in the classroom I would definitely include Book Creator. It is one of the most versatile and easy to apply apps for learning. An app that allows student to create interactive multi media books, journals, stories, instructional books for any subject or topic, research assignments, photo books, individual learning portfolios and document whole class learning (Jackie’s hatching chickens program for example). The list is limited only to your imagination.

Click here to select from 65 videos showing how educators have used Book Creator in the classroom to assist student learning. The Book Creator team have compiled these videos from around the world to promote the Book Creator app on their You Tube Channel (two of my videos are in the list – exciting for me anyway).

I have selected two videos to post here to give you a taste of what can be found in the Playlist compiled by the Book Creator team.

iPads as learning journals

During our week 8 term 3 student free day we discussed ways in which to collect and store evidence of student learning. One of these was the idea of using the iPad as a Learning Journal in particular for practical subjects. PE, Food Tech, Art, Science and Technology are all areas that could benefit from this type of learning journal. This is not to say other areas would not benefit but practical areas lend themselves to recording evidence of learning through photos and video.

The example below is a learning journal for Year 9/10 PE (Volleyball). A simple explanation of this journal is that it provides task outlines, success criteria , images and video that support those criteria and spaces for students to insert video and text explaining their learning. I have also created one for my 7/8 Badminton class.

Of course there are hurdles to over come to make this work.

  • Students need access to the same iPad, not every lesson but on a regular basis during the term.
  • The teacher has to create the learning journal in Book Creator and Airdrop (or FileBrowser) it to Book Creator on all student iPads .
  • Students need time in lessons to complete journal work (hwk not possible using school iPad).
  • Students need the opportunity to back up their journal on a regular basis to their student folder using File Browser incase their book is erased (accidentally or intentionally).
  • Students will need assistance and scaffolding to help them use apps like Book Creator and iMovie as well as any other app that might be used to create content for the journal i.e. Popplet and Explain Everything.

Once students have completed their journal the easiest way to hand it up is to Airdrop it to the teachers iPad (teacher opens in iBooks). This could potentially cause another issue as so many journals containing video will require a certain number of Gigabytes of free space on the teachers iPad. However if this is not a problem then the teacher now has access to all the students journals in their iBooks app.

Note: Students should also upload a copy of the ePub file to their student folder using the File Browser app. This allows the book to be deleted from the student and teacher iPads in the future while still providing access to it if needed i.e. a parent teacher interview.

It will be interesting to see how this process works. It is the first time I have tried it on a large scale (46 students across two classes).

Update November 2014 – A completed student journal

Make iPad books for your students – Book Creator

There are many uses for the app Book Creator including:

  • students creating narratives for English.
  • students create their own portfolios of work for a particular subject or topic. (Click HERE to see Jarrod Robinson’s video “Book Creator iPad App in A PE Classroom”)
  • students work in a cross age setting to create a book.
  • students present their knowledge of a topic for assessment.
  • students creating reports for science.

The use that I want to promote in this post is the ability for teachers to use Book Creator to create instructional books for students. This could be a more traditional text book style or a book that introduces students to a topic and provides some or all of the resources to assist with that topic.

The great thing about creating a book is that it can then be permanently stored in iBooks. It is then available not just for a single purpose but can be used by other classes or when you teach the unit again to another group of students. The ePub file can be stored on your PC so that if it is ever wiped from the iPad it can be reinstalled via the File Browser app.

It is also a simple process to upload the ePub file to a common area, i.e. a common drive on the school server and ask each student in your class to download your book using the File Browser app.


Creating an eBook – Book Creator

To assist my year 12 students I decided to create an eBook using the Book Creator app as a revision tool for their exercise physiology course. The book covers some key aspects (not all) of the content I would like them to focus on as part of their ongoing revision leading up to their exam in term 4. It is not their only revision tool but is another tool for them to access. Ideally it would be great if all the year 12’s had their own iPads but I have had to settle for putting the eBook onto 5 of the student iPads.

One of the strengths of an eBook is the ability to include audio and video. Books have always included text and images but the inclusion of audio and video makes the eBook a much more powerful learning tool. Often a book/pamphlet may include web links to further resources like a video. My opinion is that students will often not use these links (independently) even if they are helpful due to the fact they have to do another step to get to the information. By using Book Creator the video is embedded next to the text allowing for instant viewing.

With the introduction of the File Browser app it is now a fairly simple process to get an eBook from Book Creator on one iPad to many iPads. I saved my eBook as an epub file on the P drive and then accessed it through the File Browser app to get it onto as many student iPads as I wanted to. You could save an eBook to the P drive and within 10-15 minutes (depending on file size) have your whole class reading an eBook created by you (or them).

Could you use an eBook to set up a topic for students? Could your eBook be the starting resource for your students when beginning a new topic? Could your students create their own eBook to present a topic for assessment or to teach another class? Great cross age tool?

Educational Apps Part 5 – Get Creative with Music, Video, eBooks and Animation

I see potential for all of these apps to extend students creativity and engage them in their learning. The music apps excite me the most. Not being a music teacher I can still see the potential of every student in a music class having an iPad with a variety of instruments that students have learnt a song on and being used to record that song. Think of an instrument and search for it in the app store, chances are there will be an app for that instrument. Baby DJ is cool and my kids love playing this and creating their own beats and saving them. While the animation apps PuppetPals and Toontastic allow students to create clever little animations (in app purchases required for Toontastic). iMovie turns the iPad into a video editing suite that allows students to create movies with the one device – brilliant! iMotion uses stop motion technology – take photos every 1 sec (you can set your own times) and put them together to create little animations. Use Lego characters with iMotion to create a short iMotion story. Book Creator and Story Kit allow students to make and share their own stories, procedures, reports etc by inserting text, images, sounds and video. The descriptors below are from the Apps store.

Garageband


GarageBand turns your iPad, iPhone, and iPod touch into a collection of Touch Instruments and a full-featured recording studio — so you can make music anywhere you go. Use Multi-Touch gestures to play pianos, organs, guitars, drums, and basses. They sound and play like their counterparts, but let you do things you could never do on a real instrument. Enjoy a range of Smart Instruments that make you sound like a pro — even if you’ve never played a note before. Plug an electric guitar into your iPad, iPhone, or iPod touch and play through classic amps and stompbox effects. Gather your friends to play and record like a real band with Jam Session.* Use the built-in microphone or a guitar to record or capture any performance. Then mix up to eight tracks to create a song you can share in email or send directly to Facebook, YouTube and SoundCloud.

Hangdrum


This drum sounds awesome! Mandala hang drum is the first simulator of the 1st generation hang drum for iPad & iPhone & iPod Touch!


Baby DJ


Baby DJ is a music app for kids and their parents. — Bright, fun and user-friendly interface for beginner DJ — 17 children’s songs in our own 9-track format — New songs every week — Record your own mixes and Baby DJ World Top on http://babydj.ru — Baby DJ has been completely revised in version 2.0 — Original melody and beats sync system — Vinyl mode and scratch — Track Volume Control System on the iPad.


iMovie


Make beautiful HD movies anywhere with iMovie, the fast and fun movie making app that puts everything you need to tell your story at your fingertips. Browse and play projects in the Marquee view. Create Hollywood-style trailers or sophisticated home movies in minutes.* And share your finished projects with the world – right from iMovie.


iMotion


iMotion HD is an intuitive and powerful time-lapse and stop-motion app for iOS. Take pictures, edit your movie and export* HD 720p videos to your device or directly to Youtube. Time-lapse is a cinematography technique which accelerates movement. It can be used to photograph cloudscapes, plants growing, crowds… Stop motion is an animation technique which makes a physically manipulated object look like it’s moving on its own.


Toontastic


Lights, Camera, Play! Toontastic is a storytelling and creative learning tool that enables kids to draw, animate, and share their own cartoons with friends and family around the world through simple and fun imaginative play! With over 2 million cartoons created in over 150 countries, parents and teachers rave about the app… and kids can’t stop creating!


Puppetpals


Simply pick out your actors and backdrops, drag them on to the stage, and tap record. Your movements and audio will be recorded in real time for playback later.
This app is as fun as your own creativity. Act out a story of Pirates on the high seas, fight as scary monsters, or play the part of a Wild West bandit on the loose. You can even combine any characters however you want!


Book Creator


The simple way to create your own beautiful iBooks, right on the iPad. Read them in iBooks, send them to your friends, or submit them to the iBookstore. Ideal for children’s picture books, photo books, art books, cook books, manuals, textbooks, and the list goes on.


StoryKit


To create your story:
* Write some text.
* Illustrate by drawing on the screen, taking a photograph of something you see, or drawing on paper and then photographing the paper, or attaching photos from your album.
* Sounds can be recorded for telling your story or as sound effects.
* Layout the elements of your story (text boxes, images, and sound clips) freely by dragging them or pinching to resize.
* Add, reorder, or delete pages from your book.